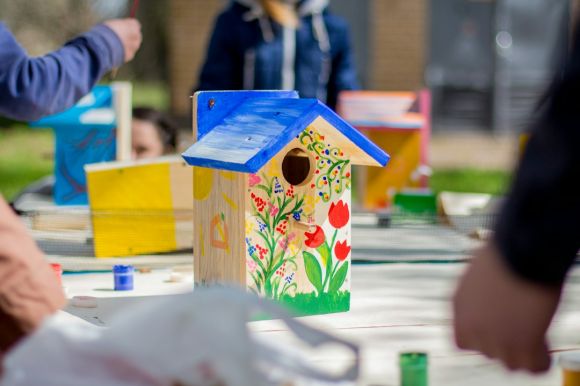
Creating a bird-friendly environment in your garden can bring joy and beauty to your outdoor space. One way to attract birds is by providing them with a cozy home to nest in. Building a DIY birdhouse is a fun and rewarding project that can be easily accomplished with a few simple materials and tools. In this article, we will guide you through the process of building your own birdhouse step by step.
Choosing the Right Design
Before you begin constructing your birdhouse, it’s important to choose a design that suits the needs of the birds in your area. Different bird species have different preferences when it comes to the size and shape of their homes. Researching the types of birds that frequent your garden will help you determine the appropriate dimensions and hole size for your birdhouse.
Gathering Materials and Tools
To build your birdhouse, you will need a few basic materials and tools. Here’s a list of what you will need:
1. Wood – Cedar or pine are recommended, as they are weather-resistant and durable.
2. A saw – A handsaw or jigsaw will work.
3. Screws or nails – Choose the appropriate size for your project.
4. Drill – You will need this for creating the entrance hole and ventilation holes.
5. Sandpaper – To smooth out any rough edges.
6. Paint or sealant – Optional, but can add a decorative touch and protect the wood from the elements.
7. Rope or wire – To hang the birdhouse.
Step-by-Step Instructions
1. Cut the wood into the desired shape and size for your birdhouse. Remember to include a front panel, back panel, two side panels, and a roof.
2. Using a drill, create an entrance hole in the front panel. Refer to your research on bird species to determine the appropriate size. It’s important to position the entrance hole away from prevailing winds and direct sunlight.
3. Drill ventilation holes near the top of the birdhouse to ensure proper airflow.
4. Assemble the birdhouse by attaching the side panels to the front and back panels using screws or nails. Make sure the seams are secure to prevent any drafts or leaks.
5. Attach the roof to the top of the birdhouse using screws or nails. Ensure that it is securely fastened to protect the birds from the elements.
6. Sand any rough edges to prevent injury to the birds.
7. If desired, paint or seal the birdhouse using non-toxic paint or sealant. Be sure to choose colors that are natural and blend well with your garden.
8. Attach a rope or wire to the top of the birdhouse for hanging.
9. Find an appropriate location in your garden to hang the birdhouse. It should be sheltered from predators and have easy access for cleaning and maintenance.
10. Sit back and enjoy watching the birds make your DIY birdhouse their new home!
Conclusion
Building a DIY birdhouse can be a rewarding and enjoyable project that adds beauty and wildlife to your garden. By choosing the right design, gathering the necessary materials, and following the step-by-step instructions, you can create a cozy home for the birds in your area. Remember to research the needs of the birds in your garden and position the birdhouse in a suitable location. So grab your tools and get started on creating a bird-friendly haven in your own backyard!
